Posts

Evaluation

Evaluation Throughout this project I have learnt that there are lots of different ways to use a camera to produce an outcome. I have learnt that a camera is not needed to create a image such as, a photogram and pinhole image. These techniques are not to be rushed as they need the right kind of conditions like the weather for a pinhole. I think I did well to develop through using the pinhole technique are some of my very first attempts were not a success. I feel like I turnt it into a strength. I think the area I could develop in is giving an area of specific object the focus point of the image. I think this could make an image more interesting. I could have improved by taking another set of images to prove and develop other skills besides landscapes. Although, I am pleased with my final images, I feel like a second set of photos may have be seen a irrelevant or be confusing compared with my first set. I maybe could have shown the different between order and chaos in the rural and u
Adding motion blur

Image
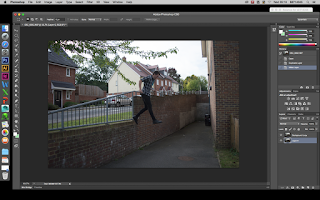
Adding motion blur I picked a picture where everything was shape and one where a subject could be blurred. First we make a background copy of the layer. I also made the background a layer. Then I go to Filter> Blur > Motion Blur Then add a mask to the layer.  I then used the eraser to rub out the person on the original layer to present the blur. Edit  > original                                               Adding a blur to produce a focus point I chose a landscape image made a background copy select the quick mask tool then gradient setting select the area I wanted in focus deselected the quick mask tool so the marching ants appear filter>blur > lens blur where alterations can be made such as, how much blur there is and add the noise  > OK cmd and d deselects the marching ants. and I then changed the Hue and Saturation to improve the overall appearance of the photo. Edit > Original  

Evaluation of Exhibition work

Image
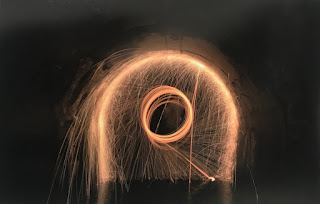
You are going to look at another person's work 1.Firstly use 5 words to describe that work Intense bright smooth rough soft 2. Now comment on the images form This means looking at the formal elements of an artwork. What is the medium of the work? The medium of the work is a digital print/ pigment print. What kind of shapes or forms can you find? I can see circular shapes where the whisk and wire was spun whilst alight. It is not a clear shape as there are streaks flicking off irregularly which makes the image quite pleasing to look out. Which  techniques have they used? A slow/long shutter speed is used to produce this image. I think the shutter speed would have been around 15 - 30 seconds. The aperture they used would have been around f11- f22 as the image has a greater depth of field. The ISO used would have been very low like ISO 100 because the shutter speed is open for a long time it lets more light in. Therefore, you need a low

Duplication/ cloning

Image
Photoshop experimentation - cloning  I took an image into photoshop and experimented with the clone tool to remove the person. I used the target to decide what to replace the area with. This is what I achieve using the clone tool to remove the person. I could change the size of the clone and also the hardness of the cloning stamp tool to be more accurate. I then used the quick selection tool to select an object and make a copy of the person onto a new layer. I experimented doing the same task but using the pen tool which can cut out a more accurate object. I had to place the individual anchors all around the edge of the person which takes longer but it is more accurate as you can get a curved edge.

Paul Hill (Digital) Research

Image
Paul Hill Digital Research Paul Hill was born in 1941 in Ludlow, Shropshire. He has worked for a newspaper as a reporter where later he became a freelance photographer in 1965. He has worked for many big companies such as, BBC, The Telegraph and The Guardian.  Hill and his wife were the first to open a residential photography workshop in their home. They live in the Peak District where he travels all over the country to teach and perform workshops in places like Shropshire, Cumbria and Nottingham. Paul Hill is very passionate about photography and he has even been a lecturer at Trent polytechnic in 1974. 1994 Paul Hill was awarded a MBE by the Queen for his services to photography. He produced his landscape project during 1979- 1989. A lot of Hills work was taken in the Peak District where he lives. This image presents a countryside field divided by a stone wall. Where the fields are on a hill a big puddle has evolved in the rain over time. In the right hand side field there is a

Ansel Adams (Film) research

Image
Ansel Adams Photographers Research Ansel Easton Adams was born in San Francisco, California on February 20th 1902. He died April 22nd 1984 in Monterey, California. He was a American photographer and environmentalist. He was known for his black and white landscape images mainly taken in Yosemite National Park, using a large format camera because of its high quality and high sharpness. He also used this camera because of its large film used. Ansel Adams had received numerous awards such as, Hasselblad award in 1981 and the presidential medal of freedom in 1980. Adams learnt darkroom techniques in which he used to present his prints in the best way. He learnt the technique of hand blending to get the best exposure throughout the image. This image involves the mountain range with a river which snakes from the foreground to front of the mountain range. The photo is in black and white and taken with a large format camera. I like the contrast of this image and the detail resembles a

Kaleidoscope

Image
Kaleidoscope I chose an image and cropped a certain section. I then increased the canvas size to 200 percent larger and moved the image to the top left corner . I then use cmd, alt and J together to copy the layer. Also by naming the layers it helps to know which piece should be where This was so I could flip the copied layer horizontal through Edit > Transform > flip Horizontal. Then move the new layer into the space next to the original. This is the original image that I used to create a kaleidoscope effect of the image.  I then repeated this process until the whole frame was filled. Next I could merge visible all of the layers for a single image. This photo to the left is this process once. The following photos are the same process carried out again.  I repeated this process to make the image more interesting. I think the more times it is done the more it looks like a kaleidoscope enlarged.