Week 4 Evaluation of Carousel Art and design
Week 4 Evaluation of Carousel Art and Design
Materials
The materials we used during these two days are cartridge paper ( A2, A3, A6), pencils, pens, charcoal, graphite sticks, ink, paint, chalk, lighting, paper photocopies of our collages, wallpaper pieces, paper 3D structures, oil based ink, scissors and the printing press.
Processes
The process we used are setting up our print making area through the press, cutting our collages into 3D structures and making 15 samples to express our feelings through, experimenting with the different lighting areas with our structures.
Technical skills
The technical skills we used during the two days in art and design are print making using the press, I think I am quite good at print making once I remembered the process. Using the lighting area to produce an image and using the printing area with care and safety. I think I did this quite well as I improved with using different areas with different lightings.
Tuesday
15 mark making samples
We cut a piece of A2 paper into 15 rectangular samples which were A6 sized paper. We had to draw our impression firstly based on significant words such as, anger, peacefulness and joy. We then filled some of the sections with specific shapes like squares and circles and finally we filled the other sections with our interpretations based on different genres of music. We also used different materials for each section such as, pencils, pens, charcoal, graphite sticks, ink, paint and chalk.Here are my 15 mark making samples, as you can see each sample is very different in tone, colour, textural feel and look. This gave me lots of option into which ones to use for my collage and where each should be places to balance out the contrast and composition.
Abstract 2D composition and contrasting textures collage
We divided an sheet of A3 paper into a minimum of 10 sections to create a grid and combined our favourite rectangle sections from our 18 mark making samples into the divided 2D A3 composition sheet. These were inspired by Mondrian's painting. This created a collage grid which was filled with different textures and patterns, we had to focus on balancing the composition.Below is my 2D collage based on my 15 samples. I think I should have focussed more on balancing the contrast as the lighter samples seemed to have been based at the top, with the more worked in samples basing at the bottom, but doing this it would have made it more effective and interesting.
Loose collograph monoprint
We then went into the printing studio, chose some wallpaper pieces which we cut up to make a print out of. We had to make sure we used different sized and proportion pieces. We rolled oil based ink onto the perspex and arranged the wallpaper pieces texture side down. We then got some newsprint over the perspex and put them through the press so the ink was transferred onto the wallpaper pieces. Then we could remove the pieces and arrange them side up onto A3 cartridge paper. This was so we could experiment with the texture and composition. Sandwiching the piece between two pieces of cartridge paper and putting it through the press again to produce a collograph monoprint. We aimed to produce around 3 prints.Here are some examples of the prints I produced during this time.
 I think these prints are made interestingly by the overlapping of the wallpaper pieces, which controls how much and where the ink is laid. So when it comes to printing areas are left unprinted or faded. I think the print to the left could be better, I feel it has too much ink and it is quite a dense and dark pieces, showing very little composition.
The print to the right has a more random feel as the shapes seem quite rushed in their placing, it is less arranged and has faded areas where it could need some more ink or ink has leaked through the overlapped section. Although, I like the definition of the different textures on the wallpaper. I think this isn't one of my best prints.
I feel this print to the left is my best one it isn't too dense and the is a clear, visible change within the pattern. I also like how there are lots of areas of the wallpaper without ink making more abstract shapes.
Wednesday
3D structure inspired by our 2D composition collages
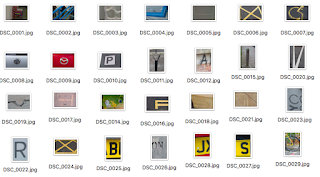
We use a photo copy of our Mondrian inspired abstract collage and folded, cut and tore it to make a 3D structure including gaps where light could travel through. We made them look like abstract buildings where we could pile them and position them in different areas of studio space with different lightings. We then photographed our paper sculptures in different lighted areas such as a projector and a spot light area, mannequin area. I first got my paper and made a square out of it by folding it then cutting it. I then cut slices into the paper bending each stripe in the opposite direction to make a prism and tapped the two opposite corners together so it would hold. I next cut the left over paper from the square with similar stripes and folded areas in different directions. We aimed to take at least 20 photos of experimentation.Here is a contact sheet of the images I took using my structure I then chose from my contact sheet the best images to present.
Here are some of my better examples of the images I took using my 3D structure
I experimented using the different lighting areas and even some students paintings as a backdrop. In the image to the left you can see my 3D structure created from my abstract collage. I used a projector to project light through the gaps showing a painting through the gaps. I think this worked well with highlighted and shadowed areas.
With the image to the right I placed two structures onto the light projector. I photographed the structure on the base of the projector to get different tones as light hit different areas. I thought this area work best so I experimented some more at different angles. However, I feel there are a couple of areas in the folds of the paper which are over exposed.
I like how you get the stripe in this photo (right) and a shallow depth of field is presented. You get a stripe of red and yellow between the under and over exposed areas. I also like how the image has a shallow depth of field.
The image to the left is on the light projector with the camera looking through the 3D structure. I like the way the colours are ordered and structured.
 With the image to the right I change the shape of my larger structure. This gave it more contrast and really emphasised the lighter areas.
I dont like how the background within this one is very under exposed, it is a very dark image with the under side of the paper being over exposed.
 The image to the left was taken in the spot light area. The black background helps to show the contrast between the light and dark area. With just one spot light, it focuses on one specific area giving it some tone. I think I should have experimented with the prism in this area to improve it.


Comments
Post a Comment