Posts

Timelapse/Hyperlapse Experiment

Image
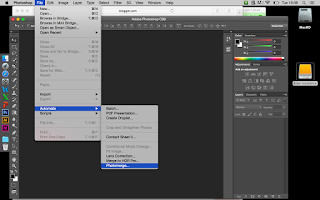
Timelapse/Hyperlapse Experiment  A timelapse is a series of images where the camera stayed in the same place and there is movement and then it shows the movement throughout the images. A hyperlapse is a series of images where both the camera and something else moves. This hyperlapse was created by photographing lots of separate images with me and megan in different positions while Cydnie took the photos. In Photoshop I pushed File > Open and selected the first photo in the series and then tick the image sequence button and then open.  I could then control the speed of the hyperlapse. Here is my final hyperlapse.  To be able to post it online I had to render. File > Export > Render Video

Panoramic Experiment

Image
Panoramic Experiment  I went out and shot a series of photos which overlap each other. I experimented using the camera portrait and landscape and also taking straight portrait images and taking landscape overlapping images, such as the last two. Photoshop > automate > photomerge Then select the photos I wanted to use and photoshop merged them together.  I then experimented with the different themes such as, reposition, collage, perspective, cylindrical and spherical.  These different themes changed the way the panoramic looked.  Theme : Collage I like this theme of editing as it doesn't make the photo look spherical. It makes the image look like a wide angle lens. I think this could be refined by extending the view and making sure the final images line up. Theme : Spherical This image looks rounded. I don't like how it looks stretched and further away. I also don't like how the final outcome of this image because to loose the white...

Subjective/Objective

Image
Subjective/Objective Subjective-  I like this image because it creates mystery as we don't know what will happen next, there is no follow on images so we must assume what is going to happen next. Objective- This image was taken in 1932. It is thought he waited for a long period as he knew someone would take this route and captured many images before finally picking this one.

Chris' Lesson 9th Nov

Description/Analysis Define: Description- a spoken or written account of a person, object, or event. Analysis-  detailed examination of the elements or structure of something. Apply: Subjective/Objective Define : Subjective - the quality of being based on or influenced by personal feelings, tastes, or opinions. The quality of existing in someone's mind rather than the external world. Objective-  a person or their judgement not influenced by personal feelings or opinions in considering and representing facts. Apply: Opinion/Assumption Define: Opinion- a view or judgement formed about something, not necessarily based on fact or knowledge. Assumption-  a thing that is accepted as true or as certain to happen, without proof. Apply:

Steve's photoshop multiplicity

Image
Multiplicity & Photoshop Experimentation We experimented using the different tools on photoshop such as, marquee tool (elliptical, rectangular and single row) eraser and paint bucket. These created different shapes and produced different marks. We then experimented with multiplicity by going out and shooting a series of photos using a camera and tripod, we could not move the tripod. In each photo our partner had to change into a different position. Here is the series of photos I shot. We entered these images into camera raw where we could edit them all the exact same.   Photoshop > file > scripts > load files into stack This loaded the images up as different layers in the layers panel. We added a layer mask to each photo, where we used the eraser to remove each person. This meant we wasn't damaging the original photo as it acts like a layer of plastic.   We then inverted it to make it visible. We repeated this process until each person was visible. Onc...

John Blakemore Research (Digital)

Image
John Blakemore Research (Digital) John Blakemore was born 15th July 1936 in Coventry. He is known for his still life, landscape photography and print making. Some significant event which happen in his life was the war in 1939, he also served as an RAF nurse from 1954-1956. He first got into landscape photography in 1970 when he moved to Derby to begin teaching. From 1971 he started to only use a 5x4 camera and simplified equipment. He solely used a 180mm Symmar S lens for both landscape and still life. This was because it was high quality and large pixels. This camera involved black and white film and it was large format. My favourite groups of photos I like the most is from all flows which are on page 62-63 from the book John Blakemore photographs 1955-2010. I also like from spirits of place which are on page 64-65 of this book. I think I like these because they relate most to some of the photos I have taken. He uses long exposures to create movement blur, in monochrome. He also h...

Steve's photoshop camera raw

Image
Photoshop Lesson 1st November 2017 We experimented with our raw images taken on the topic of order and chaos. We experimented using the camera raw edit by changing things like the exposure, contrast and some of the other sliders involved in the camera raw area. I edited my images to improve their appearance, I changed. Here are some of the photos I have edited. I chose an image from the contact sheet below and edited them using camera raw. To these images I changed the contrast, shadows, whites, clarity, black, highlights, tone curves, greyscale, detail and lens profile correction.  Here is the camera raw edit section, where there are lots of editing tools to alter. Here are the photos I edited using the camera raw edit section. I can change the brightness, contrast, clarity, greyscale, lens distortion, saturation and add a toned edge ring like what I've done below. I used the camera raw edit to edit lots of my photos to link to specific photographers such as, John Blakem...